We have had a few of our users ask about purchasing a blue-light filter for their display recently, so we thought we might do a quick write-up on a feature in Windows 11 that might provide you with a solution without having to purchase additional hardware. Windows 11 includes a built-in blue-light reduction called Night light, which warms your display colors in the evening to reduce eye strain and help your body wind down. You’ll find it under Settings → System → Display → Night light (shortcut: press Win + I, then choose Display). Click Night light to turn it on and use the Strength slider to pick how warm the screen should look; higher strength = less blue light.
To automate it, select Schedule night light. You can choose Sunset to sunrise (recommended) or Set hours to define your own start and stop times. If “Sunset to sunrise” isn’t available, enable location services first: Settings → Privacy & security → Location and turn Location services on. Night light will then kick in automatically each evening and switch off in the morning.
For quick, on-the-fly control, use Win + A to open Quick Settings and tap the Night light tile (if you don’t see it, click the pencil icon to add it). If your display supports HDR and the Night light toggle is grayed out, temporarily turn off HDR under Settings → System → Display → HDR. Color-critical work (e.g., design or photo editing) may look warmer than expected—consider pausing Night light during those tasks.
That’s it! Pick a comfortable strength, set a schedule, and use the Quick Settings toggle when you need a fast change. Your eyes will thank you.
[editors note]
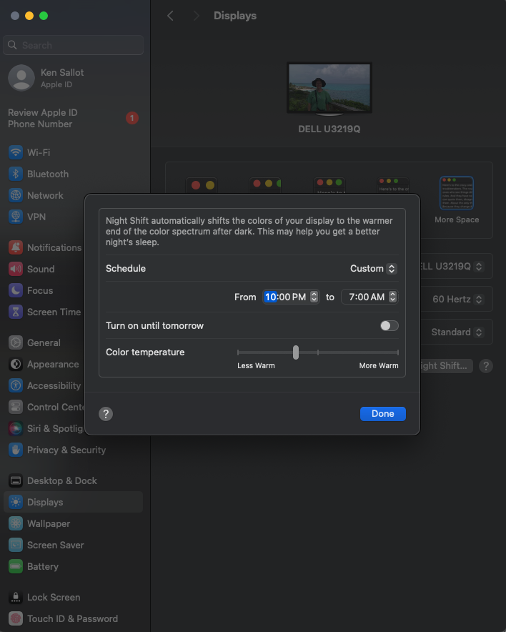
MacOS users can achieve similar functionality by enabling Night Shift mode. To enable Night Shift, bring up System Settings, go to Displays, then select the button for Night Shift to set the Night Shift settings.