As we continue our rollout of Microsoft’s Windows 11 operating system in UF Liberal Arts & Sciences, we would once again like to share few features that we find useful for boosting productivity. We provided a similar list of Windows 11 features in our CLAS IT Connections Fall 2022 newsletter last fall if you are interested in learning about other productivity enhancing features, like custom virtual desktops, snap layouts, and the widgets panel.
Before we get into things, here is a quick reminder that end-of-life (EOL) for Windows 10 is October 2025. After October 2025, Windows 10 clients will no longer receive support or security updates from Microsoft. In anticipation of the Windows 10 EOL, CLAS IT will continue to deploy all new computers with Windows 11 installed on them. We also plan to make user-initiated upgrades available to those with Windows 11 compatible devices, this means those people that are running Windows 10 but have a Windows 11 compatible computer, will be able to upgrade themselves to Windows 11. More information on the self-service upgrade can be found in our article, https://it.clas.ufl.edu/article/upgrading-to-windows-11/.
Please note that some features in this article are included with Windows 11 22H2 (October 2022 release). If you have Windows 11 installed and you do not have the features available, please contact us to schedule an upgrade to the newest supported version.
Now, let’s get to the content you clicked on this article to read: Windows 11 features!
Windows Search
Windows Search must be one of the most under utilized features in Windows 11. It is one of the features we tell our users about most when helping them find what they are looking for. Search can help you find almost anything on your computer, including files, apps, settings, and answers to questions through web results right from your taskbar. Search can even show you results from within Microsoft products, such as OneDrive, Outlook, SharePoint.
There are multiple ways to access Search. The easiest way to access Search is to find it on your taskbar and input your query there or, depending on your version of Windows 11, you can open the Start menu and start typing your query there. Using the keyboard shortcut “Windows key + S” is another way to open Search.
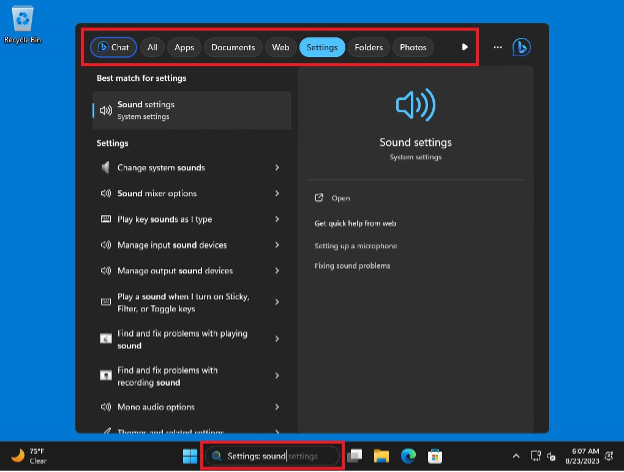
Typing anything into Search will return the top universal results from apps, settings, files, or the web. However, sometimes it is helpful to narrow down your search with the use of filters. For example, when performing a query, you can click one of the filters at the top of the results page, such as apps, documents, web, folders, music, photos, settings, along with others.
Alternatively, you can also type the query along with the filter to narrow down the search. For example, if you want to search for a specific document, you can type something like “Documents: Windows,” and the query will show only the files that match the keyword you specified. You can also use these options, “app:” “web:” “email:” “folders:” “music:” “people:” “photos:” “settings:” and “videos:” The image below shows an example of a filtered search for sound settings.
Windows Notifications
Next, we want to point out two Windows 11 features that we find useful for limiting the number of distractions we get from the myriad of applications vying for our attention in the Notification Center. Microsoft has spent notable effort to provide us with additional controls over notifications and alerts in Windows 11 that might be useful, especially while on a video call or teaching a class.
Do Not Disturb mode and Focus Assist
Do Not Disturb mode allows you to turn off all but a select few notifications and Focus Assist blocks off distraction free chunks of time to concentrate.
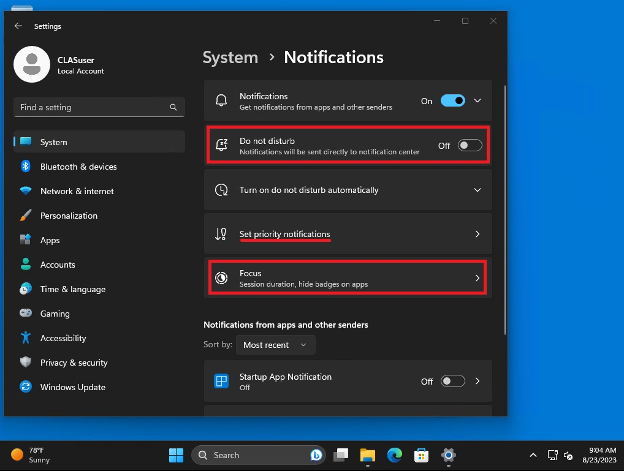
Both features – along with others – can be managed in the Settings app on the System>Notifications page. You can navigate to the page the traditional way by selecting Start>Settings>System>Notifications or – using a method we discussed in the previous section – by simply typing the word “notifications” into Windows Search on the taskbar, clicking the Settings or All filter, and pressing Enter.
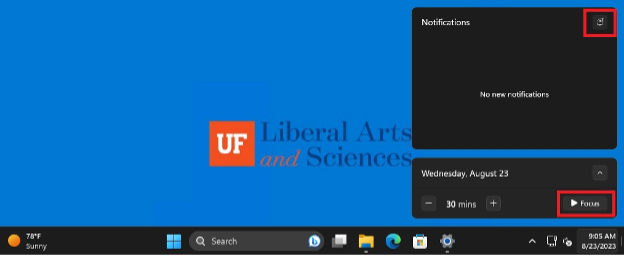
The most efficient way to enable or launch the Do Not Disturb and Focus mode features is by selecting them in the Notification Center, which can be accessed by clicking on the time/date in the taskbar. Do Not Disturb can be enabled by clicking on the small bell icon in the upper right corner of the Notification Center. Launch a Focus session by first setting a duration and then clicking on the Focus button.
Do Not Disturb and other notification and alerts settings are covered in detail in this article posted on
The Verge website.
Focus Assist is also covered in detail in this separate The Verge article.
Windows 11 Default Apps Updates
We are happy to see Microsoft is also pushing out feature updates to many of the default operating system apps that have not been updated in years. Some apps have seen significant overhauls, while others have only gotten a tweak or two.
Notepad & File Explorer
Notepad & File Explorer are two apps that only received a few recent changes, but there is one in particular we are excited about and want to point out: Tabs!
To open a new tab, simply navigate to the top of the File Explorer window and click the small “+” button next to the tab.


Snipping Tool
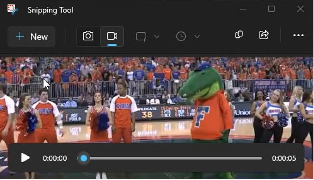
Snipping Tool screen video capture is a useful tool to capture video from all or part of your screen. To record your screen, launch the Snipping Tool. You can do this via “Window key + Shift + S” or by finding it in the Start menu by searching for “Snipping Tool.” Next, switch the snip mode to the camcorder icon, and click “New” to start a screen recording. The mouse cursor will turn into a crosshair, and you can click and drag to select an area of the screen to record.

Click “Start” from the floating toolbar to begin the screen recording. When you are done recording, tap the red stop icon in the toolbar. You also have the option to pause and delete during the recording. After you stop the recording, it will open in a player window. From here you can watch it back, save it, copy it, or share it.
Windows Clock
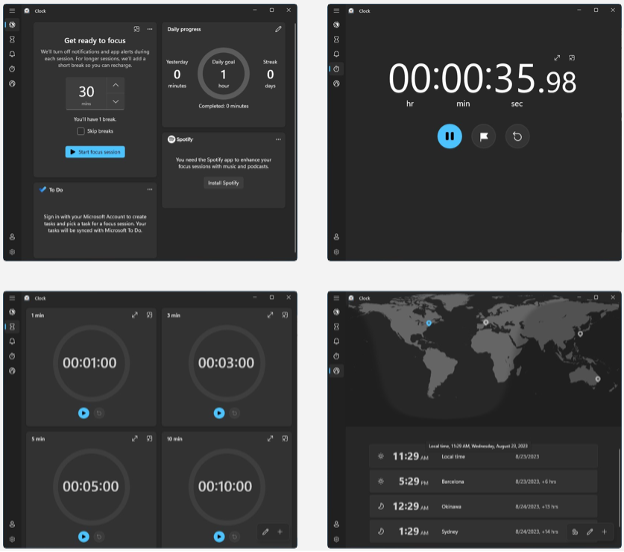
Windows Clock app has received significant changes recently. The Focus Assist feature mentioned earlier in this article now lives in the Clock App and all Focus sessions settings are stored here. We find the Timer feature helpful, especially if you need to have multiple timers running for various jobs simultaneously. The Stopwatch feature has not changed much, but the Laps/Splits and Keep on Top breakout features are helpful and often overlooked. World clock is helpful for keeping track of the date and time in multiple cities around the world simultaneously. Below are some screenshots from the updated Windows Clock app.
Clipboard History
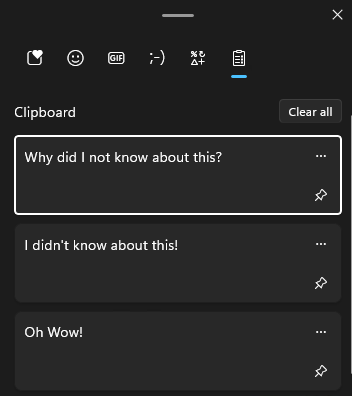
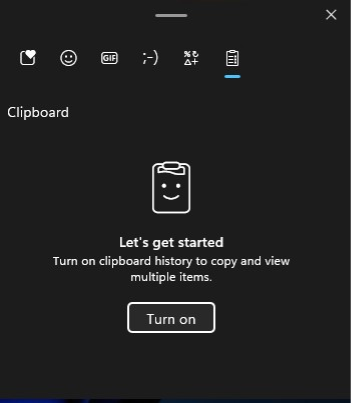
Clipboard History is another feature that has been around for a bit, yet often overlooked. To get started with clipboard history in Windows 11, press “Windows + V” on your keyboard. You will see a pop-up menu in the corner with a message that reads “Let’s get started. Turn on clipboard history to copy and view multiple items.” Click “Turn On” to enable clipboard history.
With clipboard history enabled, copy items into your clipboard by selecting them and pressing “Ctrl + C” (or clicking copy in one of the various menus). Clipboard history supports up to 25 text, HTML, or bitmap items that are 4 MB in size or smaller. To see what you have captured in your clipboard history, press “Windows + V” at any time. The most recent items copied to the Clipboard will appear at the top of the list.
